The ArcPad Team Blog

Unofficial stuff from the team behind the World's leading mobile GIS platform

Tuesday, July 31, 2012

ArcPad User Group meeting at the 2012 UC

Firstly thank you to EDS for your sponsorship of the User Group. The first attendees in the door scored a boxed lunch, and 2 lucky attendees won 1 weeks hire of mobile hardware. Also your presentation on Dollars and Sence - how to productize a custom ArcPad application was excellent - a great message for anyone with a ArcPad project they want to take to the world.For the second part of the session, we tried something a little different :).

After sitting back for a few days of heavy listening, we asked the attendees to tell us a little about how they used ArcPad. We had 55 people at the User Group and below are the group answers to the questions asked. After these questions warmed everyone up, we split the attendees into similar industry groups and encouraged them to meet others and share their experiences and questions with each other. Wow - what a noise! Everyone obviously loved this bit, even when we had to usher people outside so the next session could start, people stuck around chatting outside the doors!

How Long have you been using ArcPad?


In what industry do you use ArcPad?


What mobile hardware do you use?


Does post processing matter to you?


Do you do BOTH office GIS and field GPS work? 


Do you customise ArcPad?


In what Exotic locations have you used ArcPad?
Cold Bay, Alaska
Palmyra Atoll
Atchafalaya Basin, Louisiana
Rattlesnake Hills, Wyoming
Republic of Congo
Kuwait
Islands of coast of British Columbia
Redlands parking lot, Sturt Reserve, Zzyzx Rd (yes, these were a little tounge-in-cheek!)

In what Dangerous locations have you used ArcPad?
wildand fire projects
active taxi ways at Hartsfield Airport, Atlanta
bear survey, Alaska
coal strip mines, Northern Alabama
above 13000 ft in bad weather
collecting water meter info and getting chased off with a fire extinguisher

Of course I had to have a go at mapping these, and yes some were a little easier than others!


View Larger Map


Click 'View Larger Map' to go to the ArcGIS Online webmap and add your own exotic or dangerous ArcPad Project locations.

Tuesday, July 24, 2012

ArcPad Samples from the Esri User Conference 2012

For all of those ArcPad Users attending the Esri UC in San Diego next week, there will be a number of samples used in the Technical Workshops and Demo Theater Presentations that I am sure you will all be keen to try out for yourselves as soon as possible.


The good news for both conference attendees, as well as all of you playing along at home, is that these samples are now available for everyone on ArcGIS.com! Spoiler Alert!


Come for the Sketch Extension and stay for the SQL Update Python Sample! All of the scripts, projects and datasets that will be demonstrated during the conference have been pre-packaged and uploaded just for you!


Find all of the samples HERE!


Let us know what you think in the comments and enjoy the new samples!

Monday, July 16, 2012

ArcPad @ Esri UC 2012


esri uc 2012

Come and say hello to the ArcPad Team, and learn something new at the Esri UC in San Diego. As always there are technical workshops, demo theatre presentations, special interest groups and moderated paper sessions – below are key ArcPad (in bold) and related Mobile GIS sessions.

Tuesday, July 24

(Start Time End Time Session Title Room)

8:30AM-9:45AM ArcGIS for Mobile Devices: An Overview Ball06 E

8:30AM 9:45AM The Water, Web, and Mobile Connection 25 A/B

10:15AM 11:45AM Choosing a Mobile Solution Ball06 E

11:30AM 12:00PM Introduction to ArcPad Demo Theater - Mobile GIS Exhibit Hall B

12:00PM 1:00PM Mobile GIS Special Interest Group Meeting 04

12:30PM 1:00PM Preparing and Deploying Data to ArcPad Demo Theater - Mobile GIS Exhibit Hall B

1:30PM 2:45PM Mobile Disaster Management 17 A

2:00PM 2:30PM Selecting a Mobile Platform Demo Theater - Mobile GIS Exhibit Hall B

3:00PM 3:30PM Preparing Your Data for Field Use Demo Theater - Mobile GIS Exhibit Hall B

5:00PM 5:30PM A Disconnected Dilemma: Using ArcGIS in the Field Demo Theater - Public Safety Showcase Exhibit Hall D

Wednesday, July 25

(Start Time End Time Session Title Room)

10:15AM 11:30AM Road Ahead - ArcGIS for Mobile Devices Ball06 B

10:15AM 11:30AM ArcPad - An Introduction 31 C

12:30PM 1:00PM Using ArcPad in the Field Demo Theater - Mobile GIS Exhibit Hall B

1:30PM 2:45PM USAREUR Sustainable Range Program Omni BallC

3:15PM 4:30PM ArcPad - Customizing ArcPad Solutions 32 A

Thursday, July 26

(Start Time End Time Session Title Room)

8:30AM 9:45AM ArcGIS for Mobile Devices: An Overview Ball06 A

8:30AM 9:45AM Integrating Mobile GIS workflows in Government Agencies 27 B

10:00AM 11:00AM Customizing ArcPad Demo Theater - Mobile GIS Exhibit Hall B

10:15AM 11:30AM Using a Mobile GIS to Manage Assets in the Field 31 B

10:15AM 11:30AM Road Ahead - ArcGIS for Mobile Devices Ball06 B

11:00AM 11:30AM Publishing an ArcPad Project to ArcGIS for Server Demo Theater - Mobile GIS Exhibit Hall B

12:00PM 1:00PM ArcPad User Group Meeting 23 B

1:30PM 1:50PM ArcPad/GeoCollector - A High Accuracy Field Mapping Solution 01 A

1:55PM 2:15PM Developing Geocollector Solutions for ArcGIS 01 A

2:20PM 2:40PM GeoCollector for ArcGIS 01 A

3:15PM 4:30PM Integrating GIS and Mobile Technology into your field Workflow 15 A

Friday, July 27

(Start Time End Time Session Title Room)

9:00AM 10:15AM ArcGIS for Mobile Devices: An Overview 02

Friday, July 13, 2012

Using GPS in ArcPad - The Basics


Using a GPS to collect location information is an integral part of many ArcPad Projects. Although using a GPS receiver sounds easy enough, it is a professional and complicated piece of technology that requires an understanding of your project needs to ensure that the correct quality settings are used.

Let's start out with the basics:

What is GPS and How Does it Work?
GPS stands for Global Positioning System and refers to a space-based system of satellites providing time and location information.


A GPS receiver calculates its position by precisely timing the signals sent by GPS satellites.

Each satellite continually transmits messages that include:

1. The time the message was transmitted

2. Satellite position at time of message transmission

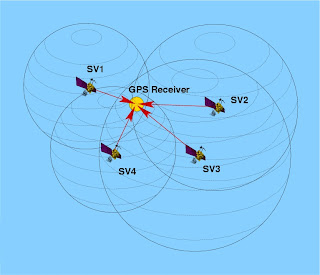
The receiver uses the messages it receives to determine the transit time of each message and computes the distance to each satellite. These distances along with the satellites' locations are used with the possible aid of trilateration, depending on which algorithm is used, to compute the position of the receiver. This position is then displayed, perhaps with a moving map display or latitude and longitude and elevation information may be included. Many GPS units show derived information such as direction and speed, calculated from position changes. Three satellites might seem enough to solve for position since space has three dimensions and a position near the Earth's surface can be assumed. However, even a very small clock error multiplied by the very large speed of light — the speed at which satellite signals propagate — results in a large positional error. Therefore receivers use four or more satellites to solve for both the receiver's location and time.


Recieving GPS Information in ArcPad:
ArcPad supports the following protocols for communicating with GPS recievers:
  • National Marine Electronics Association. (NMEA) 0183
  • Trimble Standard Interface Protocol (TSIP)
  • Delorme® Earthmate®
  • Rockwell PLGR Protocol
  • SiRF®
Any GPS receiver that outputs any of the above protocols should work with ArcPad, as long as the GPS receiver is correctly configured and properly connected to the device being used with ArcPad. This includes GPS connections via Bluetooth or USB as well as all-in-one mobile data collection devices.

ArcPad extension developers can also create their own protocol support, Trimble GPSCorrect is an example of this.

Choosing a GPS Receiver:
Some important questions to ask when looking at incorporating a GPS receiver into your ArcPad project are as follows:

Supported protocols:
Does the GPS receiver output a protocol that is supported by ArcPad?

Accuracy: What accuracy do you require for your GPS positions? Is autonomous GPS with 5–15 meters accuracy sufficient, or do you require differential correction to achieve higher accuracy? Does the GPS receiver have the ability to differentially correct the GPS positions when connected to a differential receiver or using the WAAS differential system? How well does your GPS receiver work under a canopy or in environments that are susceptible to multipath errors?

Differential correction: What type of real-time differential correction is available and reliable in the area where you will be working: beacon, satellite, or WAAS?

GPS receiver functionality: Can the GPS receiver be configured to set such factors as elevation mask, position interval, and SNR mask? Does the GPS receiver have its own display to configure the receiver and use the receiver in a standalone mode?

Cost: How much do you want to spend on a GPS receiver? More accurate GPS receivers cost more than less accurate receivers.

Size and configuration: Do you require a compact GPS receiver or a backpack GPS receiver? Ultra-compact GPS receivers tend to be less expensive but also less accurate than larger GPS receivers. GPS receivers are available in various configurations including Compact Flash receivers, PC Card receivers, Bluetooth receivers, specialized built-in receivers, add-on expansion packs, handheld receivers, integrated receivers and mobile devices, all-in-one antennas and GPS receivers, and backpack GPS receiver systems. Are cables an issue? Bluetooth is a good alternative for wirelessly connecting an external GPS receiver to your mobile device.

Availability and support: What GPS receivers are available in your local area, and is the local GPS vendor’s support adequate?

There is no perfect GPS receiver for use with ArcPad. You should consider all of the above factors when deciding which GPS receiver best meets your field GIS and GPS needs.

Set the GPS Preferences in ArcPad
There is no standard method for connecting a GPS receiver to ArcPad since most GPS receivers have unique configurations. However, by using this blog and the documentation for your GPS receiver and mobile device, it is fairly easy to successfully connect your GPS receiver toArcPad.

Determining what items are needed

In general, bluetooth is used to connect GPS receivers to Windows devices. Compact Flash and SD GPS receivers insert into standard slots on windows devices and built in GPS receivers require no connection. USB GPS receivers usually come with a USB cable permanently attached and connect to standard USB ports on window devices.

In some cases, you will need one or more of the following items to connect your external GPS receiver to the mobile device being used to run ArcPad:
  • A serial cable to connect to the GPS receiver
  • A serial cable to connect to the mobile device
  • A male-to-male gender changer
  • A null modem adapter
You will not need any of the above items if you are connecting your GPS receiver to your mobile device via Bluetooth or USB.

Connecting your GPS receiver
Using the information in the preceding discussion you should now be able to determine which cables, null modem adapters, and gender changers you will need to connect your GPS receiver to the device that is running ArcPad. Obviously, you will not need any cables or adapters if connecting via Bluetooth or when using an integrated GPS receiver, or a USB receiver. Assemble and connect the required items before moving to the next step of configuring your GPS receiver. Also, make sure that the batteries on your GPS receiver are fully charged!

Configuring your GPS receiver

By default, most handheld GPS receivers are configured to not output any GPS data. You need to configure your GPS receiver to output data, generally via the NMEA protocol unless your GPS receiver supports additional protocols such as TSIP. ArcPad supports a minimum of NMEA 0183 version 2.0 standard protocol, so make sure that you select at least version 2.0 of NMEA on your GPS receiver if the receiver supports multiple NMEA versions.

You also need to verify the communication parameters that your GPS receiver is configured for, specifically the baud rate, parity, data bits, and stop bits. You will need this information for the next step of setting the GPS Preferences in ArcPad.

If you are using Bluetooth, you will need to use the Bluetooth Manager on your mobile device to discover the GPS receiver, and possibly to pair your GPS receiver with your mobile device. Consult the documentation for your GPS receiver and mobile device for more information on connecting via Bluetooth.

When you connect your USB GPS receiver for the first time, ensure that you install the drivers for that device which allow NMEA messaging. It is not recommended to install the Microsoft Generic GPS driver for USB GPS receivers. Instead ensure that you go to your GPS manufacturers website and download the most appropriate driver for your device (if it was not supplied with your hardware). Some USB GPS receivers require additional software to translate proprietary formats to NMEA.

One example of this is Garmin's Spanner Software. Spanner creates a virtual serial port which allows you to send data to ArcPad. Refer to Garmin's website for compatible devices.

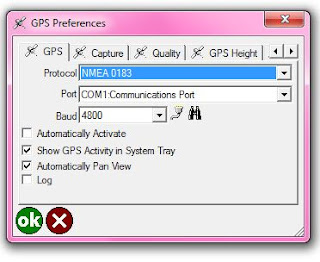
Before you can activate your GPS, you need to set the GPS communication parameters in ArcPad to match the parameters set on your GPS receiver. The GPS protocol and communication parameters are set in the GPS page of the GPS Preferences dialog box.

GPS Preferences in ArcPad:


Once your GPS is connected, the quickest and easiest way to receive GPS information in ArcPad is by using the 'Find GPS' Tool on the GPS Preferences dialog. When you tap on the binoculars on the GPS Tab, ArcPad will search for your connected GPS device and automatically configure your GPS preferences (If your know the Protocol, Port and Baud of your GPS - you can also configure these settings manually).


NOTE: If you attempt to enable the GPS from the Main Toolbar in ArcPad without configuring your GPS first - ArcPad will launch the "Find GPS" Tool for you!

Stay tuned for further blog posts delving deeper into the world of using GPS with ArcPad! If there are any particular subjects you would like to see covered, please let us know in the comments.

Friday, July 06, 2012

Customizing the Map Navigator 'On Map' Tools


The Map Navigator is a really useful set of tools for quick and easy navigation around your ArcPad Project and – like everything in ArcPad – it is totally customizable!

The potential is there for you to add extra tools to the Map Navigator, change the 'use once' nature of the current tools and increase the amount of map real-estate on your mobile device by removing all toolbars and placing your project specific tools on the map.

The options for the Map Navigator are stored within the ArcPad.apx configuration file. You can open your ArcPad.apx in ArcPad Studio to edit the XML and create a custom set of tools to put on your map. The options for customization are as follows:


Style – There are 4 styles of Map Navigator:

      Style 0 – Tall Cross
         Style 1 – Wide Cross
Style 2 – Cross
   Style 3 – Vertical

Map Navigator Style 1
 Map Navigator Style 2
 Map Navigator Style 3

Location – The Map Navigator can be aligned to the left or right of the map display by setting the 'horzalignment' element to either 'left' or 'right'.

Tint and Background Colour – These are both RGB inputs for the display of the tools on the Map Navigator. The tint is used to colour the icons for the map navigator and the background colours the background of the icons.

Transparency - The transparency of the backgrounds of the tool icons on the Map Navigator can be set by selecting a value between 0.0 (completely transparent) and 1.0 (completely opaque). 

 Red Icons (tintcolor="255,0,0")

Black Background (backgroundcolor="0,0,0" transparency="1.0") 

Button Size - The default button size for the Map Navigator is 0. If you want the button size to be larger, you can set button size to 2, 3 or 4 etc.

Tools – You can have up to 8 ArcPad Tools on your custom Map Navigator. The easiest place to find a list of the command names for all of the tools in ArcPad is on the Favorites Tab on the Toolbar Settings dialog (where you choose the tools to appear on the Favorites Toolbar). The order of the tools in the ArcPad.apx will determine the order in which the tools are displayed on the Map Navigator.

Flip Icons – In order to make your Map Navigator as aesthetically pleasing as possible when using a cross-style layout, you can flip your icons on their vertical axis by setting the value for the 'flip' attribute to 'true'. 

Use Once – The default Map Navigator has the tools set to ‘use once’ mode so that you can quickly zoom around your map when editing without changing tools. If you want the tools on your Map Navigator to remain selected, you can set the ‘use once’ attribute to false.   

Here is the XML for the default Map Navigator in ArcPad:

And here is some example XML for a customized Map Navigator (as seen at the 2011 ESRI User Conference)


And for those of you who do not want ANY form of Map Navigator Tools in their ArcPad Project, you can hide it by un-checking 'Map Navigator' in the QuickAccess menu.

So go forth and customize you Map Navigator 'On Map' Tools and feel free to share your experiences with the Map Navigator in the comments below.

Monday, July 02, 2012

Customizing the QuickAction Button in ArcPad 10

The QuickAction Button can be found on in the top right corner of the ArcPad application. This big blue button is one of the most useful and versatile tools in out-of-the-box ArcPad.

A few quick facts about the QuickAction Button:

- When using ArcPad in Design Mode, the button will change color to red and the icon will change from ArcPad to ArcPad Studio. This is to give you a visual indication of when you are working in the ArcPad customization environment.

- You can hide and unhide the QuickAction Button by selecting 'Toolbars' from the Quick Access Menu (small arrow on the left-hand side of the toolbars) and then checking or un-checking 'QuickAction' on the drop-down menu. Hiding the QuickAction Button, along with your other ArcPad toolbars can give you more space on your screen to display your map.

But why would you want to hide this awesome blue button?

Without any configuration, the QuickAction Button gives you access to many useful tools including the 'New' menu, Map Properties, Recent Maps and Layers and the ArcPad Help.


But - did you know that you can customize the QuickAction Button just like any other toolbar in ArcPad? When you put ArcPad into Design Mode and launch the Toolbar Editor (both functions can be found on the QuickAccess Menu - see the ArcPad Help for more information), the QuickAction Button is listed along with the ArcPad default toolbars.


To add tools to the QuickAction Button, simply select QuickAction on the right, select the tool you want to add on the left and click on the right-facing arrows. To remove tools from the QuickAction Button, simply select the tool listed under QuickAction on the right and then click the left-facing arrows. You can also drag-and-drop tools to the left and right to add or remove them from your toolbars.

BUT - The QuickAction Button has a couple more features that make it extra special:

- If you remove ALL BUT ONE tool, the QuickAction Button will launch that tool
- If you remove ALL of the tools, the QuickAction Button will launch a new QuickProject

I know that now you are thinking of all of the different ways you can customize the QuickAction Button in your own ArcPad Projects - be sure to leave a comment if you want to share what you have done!